
|
Ich habe Schwierigkeiten im folgenden Beispiel den Zylindermantel einzufaerben. Hat jemand eine Idee wie man da mit tikz erreicht? Oder gibt es einen besseren Weg um den Zylinder darzustellen? Öffne in Overleaf
\documentclass{standalone} \usepackage{tikz} \begin{document} \tikzset{ partial ellipse/.style args={#1:#2:#3}{ insert path={+ (#1:#3) arc (#1:#2:#3)} } } % copied from: https://tex.stackexchange.com/questions/123158/tikz-using-the-ellipse-command-with-a-start-and-end-angle-instead-of-an-arc \begin{tikzpicture} \newcommand{\wa}{7} % angle 1 \newcommand{\wb}{42} % angle 2 \newcommand{\Ra}{1} % radius 1 \newcommand{\Rb}{2} % radius 2 \newcommand{\B}{5} % width \draw[rotate=\wa] (0,0) ellipse ({cos(\wb)*\Ra} and \Ra); % draw the small \begin{scope}[rotate around={\wa:(({cos(\wb)*\B},{sin(\wb)*\B}))}] %fill=gray!30,opacity=0.2 \draw[] ({cos(\wb)*\B},{sin(\wb)*\B}) [partial ellipse=-90+2*\wa:90+\wb-2*\wa:{cos(\wb)*\Ra} and \Ra]; % draw half of the smaller ellipse at the rear side \draw[dashed] ({cos(\wb)*\B},{sin(\wb)*\B}) [partial ellipse=90+\wb-2*\wa:270+2*\wa:{cos(\wb)*\Ra} and \Ra]; % draw half of the smaller ellipse at the rear side (dashed) \end{scope} \draw[dashed] (0,0)--({cos(\wb)*\B},{sin(\wb)*\B}); % center axis % wall \draw ({0-sin(\wb-2*\wa)*\Ra},{0+cos(\wb-\wa)*\Ra}) -- ({cos(\wb)*\B-sin(\wb-2*\wa)*\Ra},{sin(\wb)*\B+cos(\wb-\wa)*\Ra}); \draw ({0+sin(\wb-2*\wa)*\Ra},{0-cos(\wb-\wa)*\Ra}) -- ({cos(\wb)*\B+sin(\wb-2*\wa)*\Ra},{sin(\wb)*\B-cos(\wb-\wa)*\Ra}); \draw[->] (-0.2,0) -- (4.2,-0.5119) node[right] {x}; \draw[->] (0,-0.2) -- (0,4.2) node[above] {y}; \draw[->] (0,0) -- ({-sin(\wb+\wa)},{-cos(\wb)}) node[below] {z}; \end{tikzpicture} \end{document} |
|
Wenn man den fertigen Zylinder aus
PS: Allerdings ist es scheints nicht ganz einfach, diese hintere gestrichelte Ellipse zu konstruieren... Öffne in Overleaf
\documentclass[border=5mm]{standalone} \usepackage{tikz} \usetikzlibrary{shapes.geometric, calc} \begin{document} \begin{tikzpicture}[>=stealth] \newcommand{\w}{42} % angle 2 \node [cylinder, draw, aspect=8.2, %rotate =180+\w, %180+42, shape border rotate=180, rotate=\w, cylinder, %text={angle=180,} cylinder uses custom fill, cylinder end fill=red!50, cylinder body fill=yellow, minimum height=6cm, minimum width=2cm] (c) {}; \coordinate (MD) at ($(c.before top)!0.5!(c.after top)$); \coordinate (MG) at ($(c.before bottom)!0.5!(c.after bottom)$); % KoSy \draw[->, shorten >= -2.5cm, shorten <=3.5cm] (MG) -- (MD) node[pos=1.7]{z}; \draw[->, shorten <=-5mm] (MD) -- ([shift={(MD)}]-\w:2.5) node[pos=1.1]{x}; \draw[->, shorten <=-5mm] (MD) -- ([shift={(MD)}]90:3) node[pos=1.1]{y}; \draw[densely dashed] (MD) -- (MG); %\fill[red] ($(c.before top)!0.5!(c.after top)$) circle(2pt); %\fill[blue] ($(c.before bottom)!0.5!(c.after bottom)$) circle(2pt); %\fill[red] (0,0) circle(1pt); \end{tikzpicture} \end{document} |
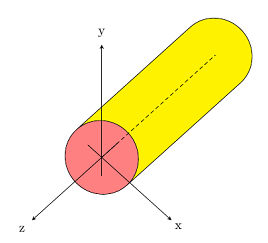

Hier ist eine Möglichkeit den Zylinder einzufäben und zu schattieren.
Eigentliches Ziel des Links aus dem Kommentar von @Murmeltier: https://texwelt.de/wissen/fragen/22898/was-ist-der-unterschied-zwischen-tikz-und-pgf/22917