|
Hallo! Ich habe dazu den ajustable-Style komplett editiert; eine einfache Ergänzung, wie hier schien mir nicht möglich. Allerdings funktioniert hier etwas nicht. Ich erhalte in jeder Zeichnungszeile eine Fehlermeldung - klickt man diese alle weg, wird des richtige Bild gezeichnet, allerdings OHNE 'Infotexte' :( Für Verbesserungsvorschläge jeder Art bin ich sehr offen! Danke! edit ===================== Also das könnte doch vll. auch ganz einfach gehen, indem man dem annotation-arrow zu ein Zipfelchen, wie im Bild gezeigt, hinzufügt. Ich weiß aber nicht, wie ich in folgendem die entsprechenden pgfpathlines (?) ergänzen kann: annotation arrow/.style = { /utils/exec={\pgfsetarrowoptions{direction ee}{.4*\the\tikzcircuitssizeunit+.3*\the\pgflinewidth}}, >=direction ee } =================== edit
%Pfeile:
\newcommand{\UpArrow}{\mathord{~\begin{tikzpicture}[baseline=0ex, line width=0.4, scale=0.13, ->, >=latex]
\draw (0,0) -- (0,2);
\end{tikzpicture}}}
\newcommand{\DownArrow}{\mathord{~\begin{tikzpicture}[baseline=0ex, line width=0.4, scale=0.13, <-, >=latex]
\draw (0,0) -- (0,2);
\end{tikzpicture}}}
.......... SIEHE ANTWORT ................. |
|
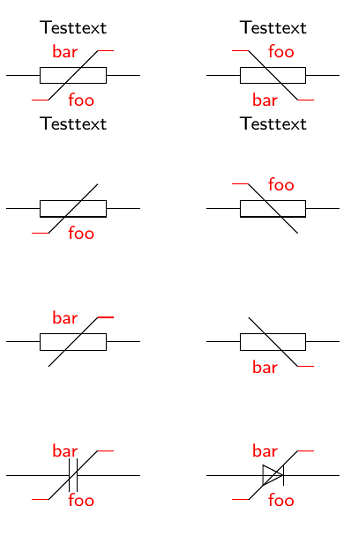
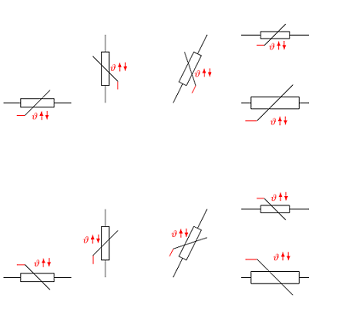
So, Texte oben/unten sind jetzt beschreibbar; z.B. mit theta für einen 'temperaturabhängigen Widerstand'. Es ist recht umfangreich geworden, aber es funktioniert.
\documentclass[margin=5mm]{standalone} \usepackage{tikz} \usetikzlibrary{circuits.ee.IEC} \usepackage{amsmath, amssymb} %%%%%%%%%%%%%%%%%%%%%%%%%% % LowUpDep %%%%%%%%%%%%%%%%%%%% \tikzset{dependent/.style={annotation arrow/.style = {>=}}} % % %LowDep %%%%% \tikzset{LowDep/.style args={#1}{ append after command={% \bgroup [current point is local=true] [every LowDep/.try] [annotation arrow,-] (-2.5\tikzcircuitssizeunit,-1.5\tikzcircuitssizeunit) edge[line to] (-1.5\tikzcircuitssizeunit,-1.5\tikzcircuitssizeunit) node[xshift=3.0\tikzcircuitssizeunit]{#1} \egroup% }}, % LowDep'/.style args={#1}{ append after command={% \bgroup [current point is local=true, yscale=-1] [every LowDep/.try] [annotation arrow,-] (-2.5\tikzcircuitssizeunit,-1.5\tikzcircuitssizeunit) edge[line to] (-1.5\tikzcircuitssizeunit,-1.5\tikzcircuitssizeunit) node[xshift=3.0\tikzcircuitssizeunit]{#1} \egroup% }} } % % % %UpDep %%%%% \tikzset{UpDep/.style args={#1}{ append after command={% \bgroup [current point is local=true] [every UpDep/.try] [annotation arrow,-] % (2.5\tikzcircuitssizeunit,1.5\tikzcircuitssizeunit) edge[line to] (1.5\tikzcircuitssizeunit,1.5\tikzcircuitssizeunit) node[xshift=-3.0\tikzcircuitssizeunit]{#1} \egroup% }}, % UpDep'/.style args={#1}{ append after command={% \bgroup [current point is local=true, yscale=-1] [every UpDep/.try] [annotation arrow,-] % (2.5\tikzcircuitssizeunit,1.5\tikzcircuitssizeunit) edge[line to] (1.5\tikzcircuitssizeunit,1.5\tikzcircuitssizeunit) node[xshift=-3.0\tikzcircuitssizeunit]{#1} \egroup% }} } %%%%%%%%%%%%%%%%%%%%%%%%%%% %%%%%%%%%%%%%%%%%%%%%%%%%%% %=========== \begin{document} %=========== \begin{tikzpicture}[circuit ee IEC, font=\sffamily\footnotesize] % \draw (0,0) to [resistor={LowDep={foo}, UpDep={bar}, adjustable={ info={Testtext}, info'={Testtext} }}, dependent] (2,0); \draw (0,-2) to [resistor={LowDep={foo}, adjustable}, dependent] (2,-2); \draw (0,-4) to [resistor={UpDep={bar}, adjustable}, dependent] (2,-4); % \draw (3,0) to [resistor={LowDep'={foo}, UpDep'={bar}, adjustable'={ info={Testtext}, info'={Testtext } }}, dependent] (5,0); \draw (3,-2) to [resistor={LowDep'={foo}, adjustable'}, dependent] (5,-2); \draw (3,-4) to [resistor={UpDep'={bar}, adjustable'}, dependent] (5,-4); %% \draw (0,-6) to [capacitor={LowDep={foo}, UpDep={bar}, adjustable}, dependent] (2,-6); \draw (3,-6) to [diode={LowDep={foo}, UpDep={bar}, adjustable}, dependent] (5,-6); \end{tikzpicture} %=========== \end{document} %=========== |