|
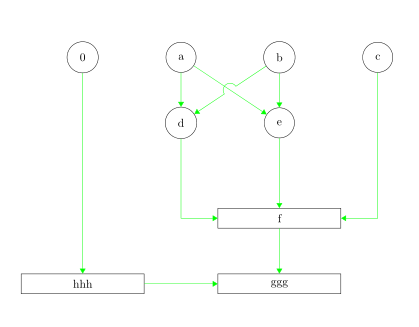
Ich habe mich lose an dieses Beispiel gehalten: \documentclass[]{article} \usepackage[ngerman]{babel} \usepackage[utf8]{inputenc} \usepackage{pdfpages} \usepackage{xcolor} \usepackage{tikz} \usetikzlibrary{positioning,arrows,chains,shapes,intersections,calc} \begin{document} \tikzstyle{int}=[draw, fill=blue!20, minimum size=2em] \tikzstyle{init} = [pin edge={to-,thin,black}] \colorlet{lcfree}{green} \colorlet{lcnorm}{blue} \colorlet{lccong}{red} \begin{tikzpicture}[% >=triangle 60, % Nice arrows; your taste may be different start chain=going below, % General flow is top-to-bottom node distance=20mm and 30mm, % Global setup of box spacing every join/.style={norm}, % Default linetype for connecting boxes ] \tikzset{ base/.style={draw, on chain, on grid, align=center, minimum height=4ex}, proc/.style={base, rectangle, text width=10em}, var/.style={base, circle, text width=4ex}, % coord node style is used for placing corners of connecting lines coord/.style={coordinate, on chain, on grid, node distance=6mm and 20mm}, % Connector line styles for different parts of the diagram norm/.style={->, draw, lcnorm}, free/.style={->, draw, lcfree}, cong/.style={->, draw, lccong}, jump/.style args={(#1) to (#2) over (#3) by #4}{ insert path={ let \p1=($(#1)-(#3)$), \n1={veclen(\x1,\y1)}, \n2={atan2(\y1,\x1)}, \n3={abs(#4)}, \n4={#4>0 ?180:-180} in (#1) -- ($(#1)!\n1-\n3!(#3)$) arc (\n2:\n2+\n4:\n3) -- (#2) } } } \node [var] (0) {0}; \node [var, right=of 0] (a) {a}; \node [var, right=of a] (b) {b}; \node [var, right=of b] (c) {c}; \node [var, below=of a] (d) {d}; \node [var, below=of b] (e) {e}; \node [coord, below=of e] (hilf) {}; \node [proc, below=of hilf] (f) {f}; \draw [->,lcfree] (a.south) -- (d); \draw [->,lcfree] (b.south) -- (e); \draw [->,lcfree] (c.south) |- (f.east); %über Kreuz \draw [->,lcfree,name path=ae] (a) -- (e); \path [name path=bd] (b) -- (d); %intersection of tspc and tapr \path [name intersections={of=bd and ae, by=bd-ae}]; \draw [->,lcfree,jump=(b) to (d) over (bd-ae) by 6pt]; \draw [->,lcfree] (d.south) |- (f.west); \draw [->,lcfree] (e.south) -- (f); \node [proc, below=of f] (g) {ggg}; \node [coord, left=of f] (hilf2) {}; \node [proc, left=of hilf2] (h) {hhh}; \draw [->,lcfree] (0.south) -- (h); \draw [->,lcfree] (f.south) -- (g); \draw [->,lcfree] (h.east) -- (g); \end{tikzpicture} \end{document} \end{document} Als ich das Flowchart erst top-bottom plante, hat das auch alles gut funktioniert mit der Frage: Wie postiere ich den offensichtlich deplatzierten Kasten so, dass er auf einer Linie mit "ggg" und "0" liegt? Es sollen noch mehrere Boxen platziert werden. Es scheint, als komme ich mit der relativen Platzierung nicht mehr richtig weiter. Wie löse ich das Problem ganz allgemein? |
|
Du nutzt Es gibt viele verschiedene Möglichkeiten Nodes anzuordnen. Mal eignet sich die eine besser, mal eine andere. Ausgehend von Deinem Beispiel könnte man es auch wie folgt machen: \documentclass{article} \usepackage{tikz} \usetikzlibrary{positioning,arrows.meta,calc} \colorlet{lcfree}{green} \colorlet{lcnorm}{blue} \colorlet{lccong}{red} % globale Settings \tikzset{ base/.style={draw, on grid, align=center, minimum height=4ex}, proc/.style={base, rectangle, text width=10em}, var/.style={base, circle, text width=4ex}, %% Stil für Hilfskoordinaten coord/.style={coordinate, on grid, node distance=6mm and 20mm}, % Stile für Verbindungslinien norm/.style={->, draw, lcnorm}, free/.style={->, draw, lcfree}, cong/.style={->, draw, lccong}, % Stil für Kreuzungen von Pfaden jump/.style args={(#1) to (#2) over (#3) by #4}{ insert path={ let \p1=($(#1)-(#3)$), \n1={veclen(\x1,\y1)}, \n2={atan2(\y1,\x1)}, \n3={abs(#4)}, \n4={#4>0 ?180:-180} in (#1) -- ($(#1)!\n1-\n3!(#3)$) arc (\n2:\n2+\n4:\n3) -- (#2) } } } \begin{document} \begin{tikzpicture}[% >={Triangle[angle=60:5pt]},% Form der Pfeilspitzen node distance=20mm and 30mm, % Vorgaben für Abstände zwischen Nodes in dieser Zeichnung every join/.style={norm}, % Default linetype for connecting boxes ] \begin{scope}[nodes=var] \node (0) {0}; \node [right=of 0] (a) {a}; \node [right=of a] (b) {b}; \node [right=of b] (c) {c}; \node [below=of a] (d) {d}; \node [below=of b] (e) {e}; \end{scope} \node [coord, below=of e] (hilf) {};% Hilfskoordinate für definierten Zusatzabstand \begin{scope}[nodes=proc] \node [below=of hilf] (f) {f}; \node [below=of f] (g) {ggg}; \node (h) at (0|-g) {hhh}; \end{scope} \begin{scope}[every path/.append style=free] \foreach \start/\end in {a/d,b/e,e/f,0/h,f/g,h/g} \path(\start)--(\end); \path (c)|-(f); \path (d)|-(f); %über Kreuz \path (a) -- coordinate(bd-ae) (e); \path [jump=(b) to (d) over (bd-ae) by 6pt]; \end{scope} \end{tikzpicture} \end{document}
|